
A belt conveyor for a packaging line must carry the actual carton, tray or pouch through transfers, starts and stops without losing support or control. Choose the belt surface and construction around that handling task, then match the take-up and tracking arrangement to the belt.
When comparing proposals or replacing an industrial conveyor belt, start with the following inputs. They turn “PVC or PU?” into a specification that the conveyor builder and maintenance team can use. For broader equipment choices, see packaging conveyor systems; the packaging guides connect those choices to the rest of the line.
| Input to establish | What to record | Decision it changes |
|---|---|---|
| Package base and stability | Smallest footprint, underside seams, flexibility, mass and center of gravity | Belt support, transfer arrangement and tipping checks |
| Motion | Speed range, starts/stops, incline and any reversal | Grip, drive location and take-up behavior |
| Contact conditions | Dust, moisture, leakage, cleaning chemicals and temperature | Exact cover grade, texture and cleaning compatibility |
| Load pattern | Spaced packs, side loading or a held queue | Lateral forces, support friction and accumulation method |
| Service space | Access beside the tail, under the belt and along the removal route | Take-up travel, cleaning and replacement work |
Match the belt conveyor to the package and transfer
Select the support and end geometry together. A slider bed supports a fabric belt continuously; roller support can reduce support friction on longer or more heavily loaded runs. The smallest package still has to cross each handoff reliably. Habasit’s Fabric Conveyor Belts Engineering Guide, pp. 9–10, describes these support arrangements.
At a transfer, inspect the package base as well as the visible gap. A stiff carton, a tray with feet and a flexible pouch can behave differently at the same joint. Include the shortest footprint in the travel direction, bottom seams and the receiving conveyor’s height and speed in the trial. Watch for catching, nose-diving, rotation and loss of spacing.

A smaller end pulley may improve transfer geometry, but the belt must tolerate that bending radius. Confirm the minimum pulley diameter for the exact belt construction before changing the nose or specifying a thicker replacement. Reserve the take-up and belt-removal space in the packaging-line layout, while machine positions are still adjustable.
Compare PVC and PU fabric belts with modular plastic
PVC and polyurethane describe cover materials; modular describes a belt construction. In a coated fabric belt, reinforcement carries the tensile load and the cover provides the conveying surface. Habasit lists PVC and thermoplastic polyurethane, or TPU, among its cover options. A modular plastic belt instead consists of linked modules and hinge rods driven by sprockets.
| Selection question | PVC-coated fabric belt | TPU-coated fabric belt | Modular plastic belt |
|---|---|---|---|
| What is the complete specification? | Cover grade and texture, fabric reinforcement, thickness and splice | TPU grade and texture, fabric reinforcement, thickness and splice | Resin, series, pitch, surface/openings, rods and sprockets |
| What establishes package grip? | Actual cover/package pairing in expected conditions | Actual cover/package pairing in expected conditions | Module surface/package pairing in expected conditions |
| What governs tension? | Reinforcement and application-specific initial elongation | Reinforcement and application-specific initial elongation | Sprocket engagement, return support and designed sag/take-up |
| What limits the transfer? | Permitted pulley diameter and belt flexibility | Permitted pulley diameter and belt flexibility | Pitch, sprocket/nose geometry and package support |
| What must cleaning approval cover? | Exact cover, splice and chemical/temperature exposure | Exact cover, splice and chemical/temperature exposure | Resin, rods, hinges, openings and access to the return |
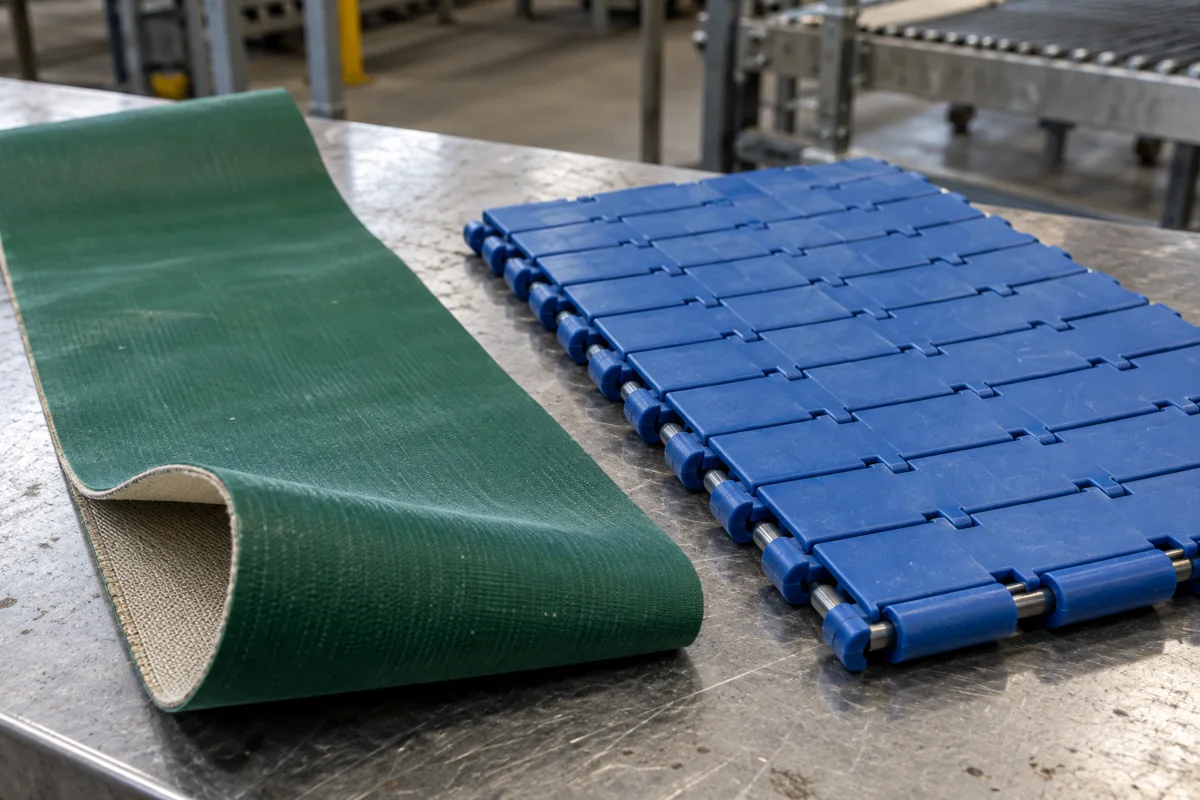
Compare exact belt grades against the cleaning process, product contact and package trials. Color alone does not identify a coating or establish food-contact suitability. For food contact, obtain the declaration for the selected material and grade. For modular belts, specify whether the surface is solid or open and how the hinges and underside will be cleaned. These construction distinctions follow Habasit’s fabric guide, p. 4, and HabasitLINK Plastic Modular Belts Engineering Guide, pp. 4 and 10.
Separate package grip, drive traction and bed friction
Belt conveyor design has three different friction interfaces. Improving one can change a different part of the handling problem:
- Package against conveying surface: enough grip to accelerate and climb, with suitable behavior if a package is held stationary.
- Belt against drive pulley: enough traction to transmit the drive force without slipping; tension, wrap and pulley surface all matter.
- Belt underside against support bed: friction that the drive must overcome along the supported run.
A pulley-side friction value cannot stand in for carton-to-cover grip. Specify which surfaces and conditions a coefficient describes. Habasit’s fabric guide treats conveying surfaces, support and drive traction separately on pp. 4, 9 and 14.
For an incline, screen the actual package on a sample of the proposed belt cover. Habasit’s p. 41 method tilts a supported sample until sliding starts. The operating incline must remain below that sliding-onset angle, with further allowance for the actual speed, stop/start motion, moisture, contamination and belt condition. Check tipping separately: a tall pack can become unstable before its base slides.
If a pack slips or tips during the representative trial, the proposed incline and surface pairing has not passed. Change the surface, incline or handling arrangement and repeat the trial. A resin name cannot resolve that failure. Where packs will queue against a stop, also evaluate rubbing and back pressure; the accumulation and line-buffer guide covers the storage decision.
Choose take-up by its function and usable travel
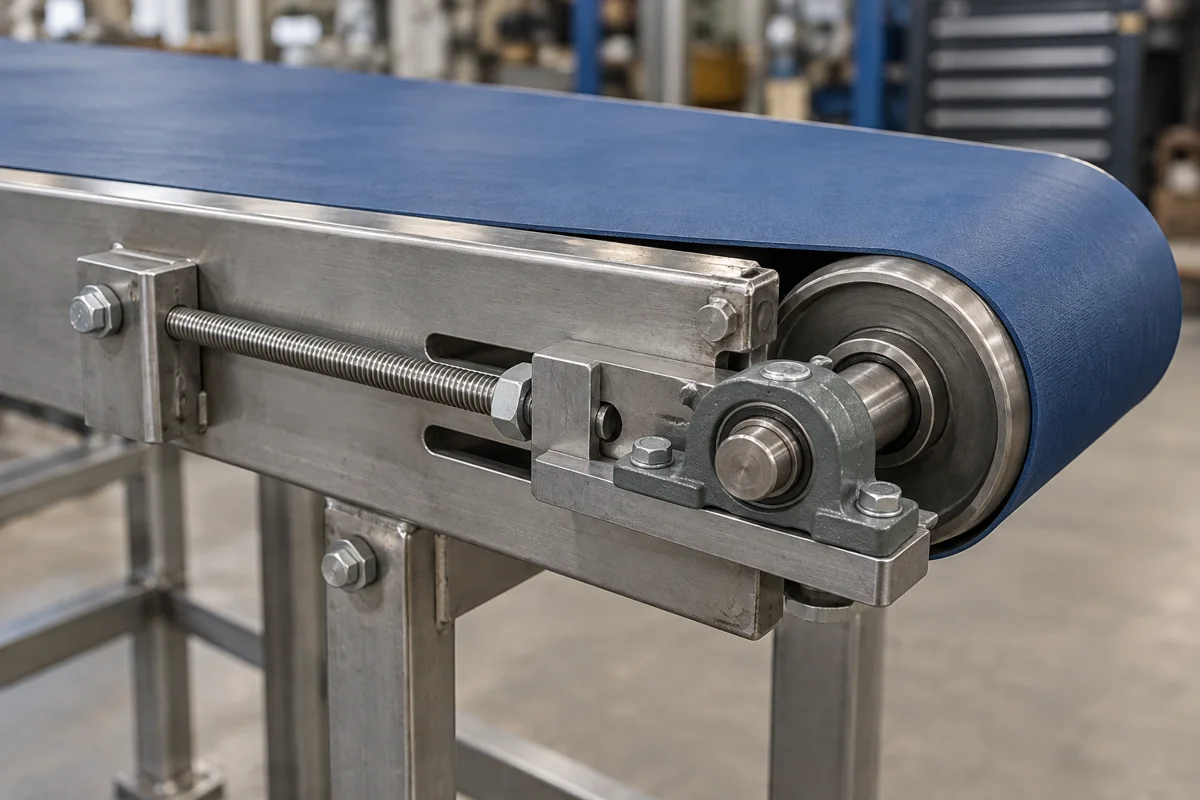
A screw take-up sets position; an active take-up compensates for length change within its available travel. Both must establish the specified belt tension without forcing the roller out of alignment.
| Arrangement | What it does | What to confirm in the proposal |
|---|---|---|
| Paired screw take-up | Moves the pulley ends to fixed positions | Access to both sides, repeatable adjustment and a way to check alignment and tension |
| Active pneumatic take-up | Uses a moving actuator arrangement to maintain the intended tensioning force | Force/control function, guidance of both pulley ends, usable travel and behavior on air loss |
| Pneumatically positioned, then fixed take-up | Uses air to position the roller before it is held | How the final position is secured and when tension is rechecked |
Pneumatic actuation alone does not establish automatic compensation. Likewise, spring force varies with deflection; the arrangement must provide the intended tension across its working travel. Dorner’s Belt Tensioning Methods for Small Package Conveyors explains how screw adjustment affects tracking and how pneumatic compensation runs out when travel is exhausted. Habasit’s fabric guide, pp. 15–16, distinguishes fixed-position and constant-force devices.
Keep take-up allowance separate from initial elongation
Habasit’s fabric engineering guide, p. 16, gives these take-up allowances by traction fabric, while its installation guide, p. 5, gives initial elongation guidance:
| Traction fabric | Take-up allowance in the engineering guide | Initial elongation in the installation guide |
|---|---|---|
| Polyester | At least 1.5% of belt length | Minimum 0.3%; maximum around 1% |
| Polyamide | At least 2.5% of belt length | Minimum 0.5%; maximum around 1.5% |
These are Habasit’s fabric-belt design recommendations. Use the calculated belt/application-specific initial elongation when supplied. The two columns serve different purposes: take-up provision accommodates installation and operational length changes, while initial elongation sets the belt’s installed tension. Translate the allowance into actuator travel using the actual belt path and take-up geometry.
Record the installed position and the travel remaining after tensioning. For a reversing conveyor, review the tensioner arrangement in both directions: Habasit advises against a single constant-force arrangement under full-load reversal unless appropriately configured, such as with tensioning devices on both sides of the drive pulley.
Control belt conveyor tracking with alignment first
Correct frame, pulley and belt conditions before using an adjustment to steer the belt. More tension is not a general cure for sideways drift. Excessive adjustment loads the belt and bearings and can shorten their service life.
Start with isolated mechanical checks: a rigid, square frame; aligned pulleys and rollers; clean contact surfaces; and a correctly joined, undamaged belt. Restore guarding before operational observation. Use the machine’s isolation and commissioning procedure for access to nip points and any adjustments.
| Observation | Check first | Useful next action |
|---|---|---|
| Belt drifts while empty | Frame squareness, pulley alignment, buildup and belt/splice condition | Correct the mechanical cause before further steering adjustment |
| Drift appears during side loading | Direction and location of package side force | Review the loading arrangement and local guidance |
| Tracking changes after retensioning | Relative movement of the two pulley ends | Recheck pulley alignment and specified elongation |
| Adjustment reaches its travel limit | Installed position, required belt length and remaining travel | Restore the intended take-up range before further commissioning |
Once the basic conditions are correct, make small corrections to one designated pulley at a time using the OEM procedure. Allow several belt revolutions to observe the response before making another correction. Habasit’s Fabric Conveyor Belts Installation and Maintenance Guide, pp. 3 and 6, supports this sequence.
Crowned pulleys and V-guides solve different problems
A crowned pulley has a slightly larger diameter toward its center and provides a self-tracking effect for suitable fabric belts. Crown geometry must match the belt construction and pulley dimensions. Improvised crown buildup or extra tension can introduce a new problem instead of correcting the original alignment fault.
A V-guide on the belt underside runs in a matching groove. Habasit’s fabric guide, pp. 29–30, describes guidance against localized lateral forces, with suitable groove clearance and normal tracking established first. Include the side-loading forces in the design review; a guide cannot substitute for a square frame and aligned rollers. The conveyor OEM should specify the compatible crown, guide and pulley arrangement.
Treat modular-belt sag and tracking separately
A modular belt needs reliable sprocket engagement and the return arrangement specified for its series. Designed catenary sag supplies the small tension needed for engagement and accommodates length change. Tightening it like a fabric friction-drive belt changes that behavior.
Check shaft alignment, sprocket position and the designated locked sprocket locations. Verify sag over the specified return span using the selected belt’s instructions. Record operating temperature and return support conditions with the measurement, because belt length changes affect the return. Habasit’s modular engineering guide, pp. 22–25 and 69, covers these relationships and requires stopped, locked-out controls for sag or gravity-take-up adjustment.
Belt-material and tracking acceptance checklist
Agree the limits before the trial, then record what happens at the package and belt. Use the same package set, operating conditions and acceptance criteria when comparing conveyor proposals.
| Check | Requirement to agree | Observation to record |
|---|---|---|
| Belt identity | Exact grade, construction, reinforcement or modular series, splice/rods | Installed belt identification and matching documentation |
| Package support | Smallest footprint, underside features and transfer configuration | Catching, tipping, rotation and spacing at each handoff |
| Grip and incline | Pack variants, surface condition, speed and starts/stops | Sliding or instability through the full trial sequence |
| Fabric tension | Application-specific initial elongation and measurement procedure | Measured elongation and pulley alignment |
| Take-up reserve | Required operating range and accessible adjustment route | Installed position and remaining usable travel |
| Tracking | Agreed belt-edge clearance and allowed movement | Empty and representative loaded running, including side loading and reversal where used |
| Modular return | Series-specific sag, span and sprocket arrangement | Sag, engagement and lateral position under specified conditions |
| Maintenance | Isolation, cleaning and belt-removal procedure | Access to both ends, underside and replacement route |
Download the belt-material and tracking acceptance checklist (CSV). It includes columns for the agreed requirement, observation, pass/fail result and corrective-action owner. Add the conveyor identification, package set, speed, environmental conditions and trial date before recording results.
Use the completed record alongside the commissioning and acceptance checklist to resolve transfer, tracking and maintenance issues before accepting the line.